 Cryo-Notes
from SSRL Workshop October 1995
 Cryo-Notes
from SSRL Workshop October 1995
by Håkon Hope
This page is a copy of a handout for a workshop
held at SSRL in October 1995. The handout was printed on a
gray-scale printer, and there is no color. As a consequence the
appearance is a bit drab. As time permits we will issue updates
aiming for improvements both in appearance and contents. In our
opinion the number of requests for this document justifies
release on www at this time. We are in the process of writing a
paper to describe these techniques, and would be glad to give you
a pre-print copy once it is done.
We now know that biocrystals can be cooled to cryogenic temperatures and still retain their crystallographic integrity, and that in most cases radiation damage is then eliminated as an experimental problem. Still, biocrystals have a natural tendency to develop ice and cease to diffract when they are cooled. Successful cooling requires special handling.
We have arrived at the conclusion that in virtually all cases of ice formation on cooling to cryogenic temperatures the process starts in a layer of liquid on the surface of the crystal. It is therefore necessary to remove or modify this layer. In the simplest cases one can begin by covering the crystal and some of the mother liquor with oil. One can then blot off any visible liquid, or else strip it off by moving the crystal through the oil.
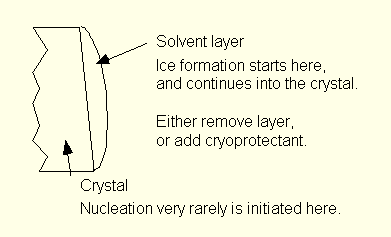
More difficult cases require that the surface layer be modified
with a cryo-protectant. Cryoprotectants are compounds that
prevent ice formation on cooling when added to aqueous solutions.
Typically the cryoprotectant is added to a portion of mother
liquor, usually in the range 10-25% by volume.
Because the action is at the surface of the crystal, it is
normally not necessary to soak the crystal for any length of
time. A few seconds (<10 s) of rinsing will often suffice.
There may be crystals that require more time to disrupt the water
layer on the surface. Some crystals do not tolerate the modified
mother liquor well, so they should be cooled as soon as possible
after rinsing.
An effective way of cooling is to plunge the crystal on its
mounting pin into liquid nitrogen. Cool-down to 140 K can be
accomplished in 0.6 sec for a crystal of 0.75 mm cross section.
The use of special coolants (e.g. liquid propane) is not
recommended. Such coolants complicate the operation
significantly, and add non-trivial hazards, with no cooling
advantage (see below).
A
Note on Nomenclature
Freezing in physics refers to a phase transition that results in
the formation of a new crystalline phase. (In conversational,
non-technical language freezing is often used as a synonym for
very cold. ) In our cooling experiments we want to avoid the
formation of an ice phase. So we cool
our crystals, we do not freeze
them.
Cooling the Crystals
When we use an open-flow gas-stream apparatus
there are in practice two ways of cooling the crystal: either
directly in the cold stream, or by immersion in a cold liquid
before the crystal is moved to the gas stream.
Cooling in the gas stream is a simple procedure, and should be
used whenever practical. However, some crystals do not tolerate
the delay caused by carrying the crystal from the mounting
station to the diffraction apparatus, so that immediate cooling
is needed. Other crystals, especially larger ones, may fare
better with liquid cooling. This is best done by immersing the
crystal in a cryogenic liquid.
The Problem
When a larger object at room temperature is immersed in liquid
nitrogen at its boiling point, large amounts of gas form. This
gas creates an insulating layer around the object, so that
cooling to liq. N2 temperature is relatively slow. A similar
experiment, using liquid propane near its freezing point as the
coolant, results in less bubble formation, and a more rapid
cooling. This observation on the behavior of large objects has
led to the belief that liquid propane is a better coolant than
liq. N2 also for crystals intended for x-ray diffraction
experiments. The belief has no foundation in reality. I have
measured the cooling rates of crystal-sized objects in three
different media:
(1) Cold nitrogen gas (100 K)
(2) Liquid nitrogen (77 K)
(3) Liquid propane (100 K)
Measurements
Two temperature probes were prepared. They were small
Cu-constantan thermocouples made from 0.125 mm wire. The junction
diameter was about 0.25 mm. One of the junctions was coated with
RTV glue to simulate a crystal about 0.75 mm across. The
thermocouples were then bundled together. Temperature related
EMFs vs. time were measured with a 12-bit, multichannel A/D
converter board mounted in an Intel based PC. Readings were taken
at 0.01 sec intervals. For each run the data from the two
thermocouples were measured simultaneously.
For the gas stream measurements the stream was deflected while
the thermocouples were positioned. With the thermocouples in
place the stream was suddenly released. For the liquid immersion
measurements the thermocouples were inserted into the liquid by
hand as quickly as possible.
Results
N2 gas: The bare junction reached the target temperature (Tt =
140 K) in about 0.8 s, the coated one in about 2 s.
Liquid N2: The cooling curve for the bare junction usually showed
a slight initial slope, perhaps caused by some hand hesitation as
the junctions approached the liquid, but even so the time to
reach Tt was only about 0.15 s. The coated junction showed a
delay of about 0.2 s before beginning cooling was registered. It
took about 0.6 s from the time of immersion to reach Tt.
Liquid propane: The cooling rate for the bare junction was nearly
the same as for liquid N2, 0.15 - 0.18 s to Tt. An initial delay
of 0.2 s was again seen. It took 1.2 s from immersion to Tt.
Conclusion
The unambiguous conclusion to be drawn from these measurements is
that liquid N2 yields the highest cool-down
rate among the three media tested. Because the rate of
heat transfer is proportional to the temperature difference there
is an a priori advantage to liquid N2. For the small samples
used, heat transfer is not impeded by bubble formation.
One disadvantage of liquid propane is the tendency for the upper
layer of liquid to warm up toward the boiling point, unless it is
stirred. I have measured more than 100 K temperature difference
between top and bottom of a small container. (Propane has fp. 83
K and bp. 228 K.)
The simplicity of the liquid N2 method should make it the method
of choice. The use of liquid propane adds both hazards and
operational complications, without any apparent cooling
advantage. A number of protein crystals have been successfully
cooled in liquid nitrogen.
SOME IMPLEMENTS
In this section I describe some implements that I use. They have gone through stages of modification, and have been tested by a number of people with varying dexterity.

Sketch of a hollow mounting pin. The diameter is 0.125" (3 mm is also used). The overall length is typically 30 mm. The bore at the tip is about 0.5 mm, the rest about 1.5 mm. The cut angle for the cone is 10° (total angle 20°). The pin is hollow so the tip can be filled with solder by capillary action. The material is copper (brass conducts heat too poorly). A glass fiber or a loop held in a glass capillary is soldered into the tip.
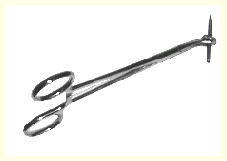
Curved-nose hemostat clamps are convenient for handling cold mounting pins. Pins at room temperature may just as well be held with your fingers.
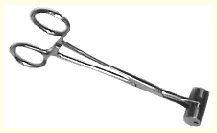
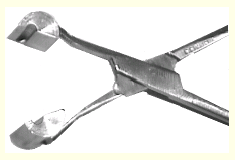
Two views of transfer tongs. The mounting pin is held with the
crystal inside the cavity that forms when the tongs are closed.
The hole is closed at the end to protect the crystal from air.
CRYSTAL HANDLING
Handling of the crystal is straightforward with the
implements shown. It is still a good idea to practice the various
steps with a mounting pin that has just a glass fiber attached.
If you can go through the steps without losing the fiber you
should be ready for a crystal.
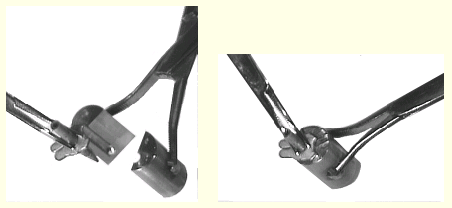
These pictures show how the mounting pin is picked up. The pin and the clamp of the transfer tongs are held under liquid nitrogen during this operation.
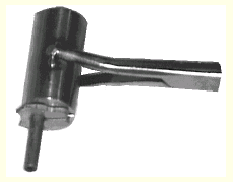
This shows the situation after the mounting pin has been
secured in the transfer tongs. The crystal is well protected
inside. (Be aware that the clamp is still in liquid nitrogen.) It
is now possible to carry the liquid nitrogen container to the
diffraction instrument, and then move the crystal to the
goniometer head without significant temperature change during
transfer. For this to make sense, a cold stream must already be
running.
Note the collar on the mounting pin. It prevents
the pin from going too far into the clamp. It also has a function
if the crystal is to be stored cold for future use (next page).
NOTE ON CRYSTAL HANDLING
The traditional way to move a crystal between various liquid
media is to suck it into a fine pipette in one medium and eject
it into the next. I now use a loop for these operations. With the
loop it is possible to pull just one crystal from a multicrystal
drop without taking along a large proportion of the drop in the
process. This greatly reduces the risk of loss of the remaining
crystals. The loop is particularly useful for brief rinses. To my
taste it is much easier to handle than even a fancy pipette.
STORING CRYSTALS
A crystal that you want to use later can be removed from
the goniometer head with the transfer tongs and deposited in a
cryogenic storage container.
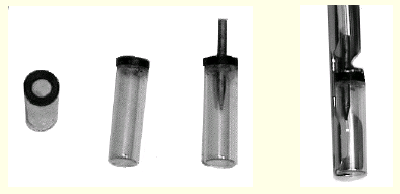
This is an illustration of the storage technique. On the left
are two views of empty storage vials. Next is a vial with a
mounting pin inserted. The last picture shows a storage vial held
in a standard storage strip.
A small, straight vial with a ring magnet glued to the opening is
used to hold the mounting pin and crystal. I use 0.5" glass
vials and 0.5" ring magnets with a 0.25" hole. The
magnet is attached to the vial with clear RTV (silicone rubber)
cement. (RTV is an ideal adhesive for objects that will be cooled
to liquid nitrogen temperature. It holds well, and does not crack
on repeated cooling and warming.) The mounting pin has a steel
collar (not stainless) that is visible on pictures shown on the
previous page.
ADDENDUM
Following are instructions for the manufacture of the transfer
tongs.
It is imperative that the clamp part be machined and assembled with enough precision so that the crystal is in an air-tight chamber during transfer. There should be no visible gaps anywhere.
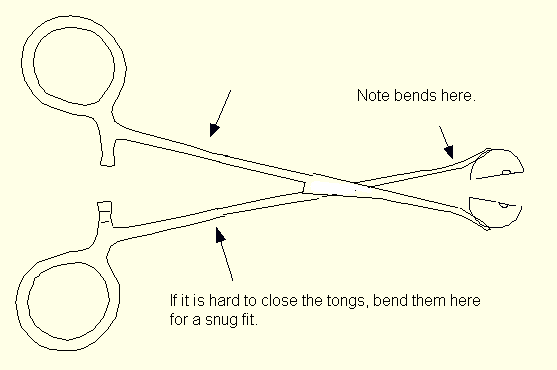
Sketch of the finished transfer tongs.
The next page shows details of the carrying block, with assembly instructions. The block is made from stainless steel. Be sure to have a mounting pin, or another 0.125" rod in the hole during welding. This is necessary in order to properly align the two halves.
The hemostat tongs are student quality. I get
them from the campus bookstore, where they are about $5 each.
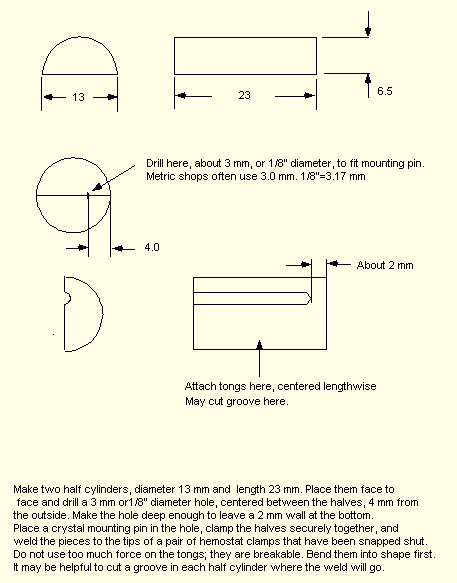
Click here for a sketch dimensioned in inches.
Note by Sean Parkin
One difference between my technique and Håkon's is to do with the storage vials. Mine are made of polycarbonate with a steel ring (actually a bent paper clip) glued with RTV onto the open end. My magnets are a bit stronger and act as the lid for the vial. The mounting pins have a similar steel collar, but the pin is inserted backwards into the magnet. I find this more convenient, as the hole that the delicate (i.e. crystal) end goes through is now just the opening of the vial rather than the smaller hole through the magnet.
Table 1. Temperature response of a fine thermocouple mounted in a copper pin held in stainless steel tongs in still air and in a draught (the draught was from a small diaphragm pump and was intended to simulate movement of the tongs through the air).
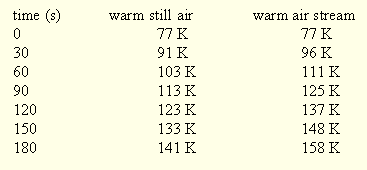
Table 2. Temperature of a fine thermocouple
mounted in a copper pin held in stainless steel tongs during
crystal mounting on to a Huber four circle
goniometer head into a cold gas stream at 125K.
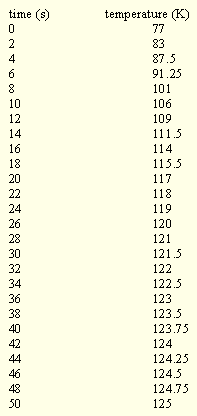
The temperature response during dismount is essentially the same, but in reverse. All other manipulations are carried out under liquid nitrogen, so they are all at 77K. One word of caution though - since water vapor will condense in the dewar, some fine snow particles will build up and percolate round in the liquid nitrogen. It is a good idea to get fresh liquid nitrogen quite often so that the chance of any of this snow sticking to the mount while it is submerged is minimized.
To learn more about our cryo-cooling of crystals
click the image of xxxxx 
![]() Back to X-ray Facility Introduction
Back to X-ray Facility Introduction
LLNL Disclaimer
This World Wide Web site conceived and maintained by
Bernhard Rupp (br@llnl.gov)
Last revised April 06, 1999 11:04
UCRL-MI-125269