Make yourself a Xmas tree decoration
To make this model you will need:
- A printer
- Some method of cutting out paper or thin card
- Quick-drying paper glue
- thread for tying the model to the tree
- Either
- Or an Acrobat PDF reader

download the zipped Draw file (6K) and unpack it
with !SparkPlug or the PDF (6K); then follow the directions below to make the model on the
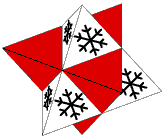
left. It is made from two different coloured parts, you may want to change
the colours or the decoration using Draw, or duplicate the Draw file to make
several different coloured models.
Then repeat the instructions below for each model:
1.Print the Draw file onto stiff paper. If you have not got access to a
colour printer you might want to separate the Draw file into two parts and
print each part onto different coloured paper.
2.
Cut round the edges of the 8 parts carefully (a modelling knife, steel rule and cutting board work better than scissors);
then score along the lines.
3.Fold the pieces down along the dashed lines and up along the solid lines.

4. Make a loop of thread with a knot; then fix it by the knot to the
inside of one of the white parts for hanging the model on the
Xmas tree.
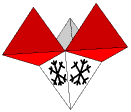
 5. Glue one side of one of the red parts to itself to make a tetrahedron
with open base to look like this. Glue 2 more of the red parts into
tetrahedra. Then glue all 4 of the white parts (with snowflakes) into similar
tetrahedra, making sure that the hanging loop comes through the point of one
of them.

6. Glue the 3 red tetrahedra onto one of the white ones.

7. Glue the remaining 3 white parts between the 3 red tetrahedra leaving
a triangular hole with tabs all round it.
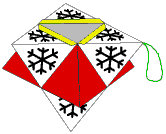
8. For the last (red) part: first fold it up into a tetrahedron and compare
it with the rest of the model so that you know how it has to fit.
Then glue the red part with the tab on its side to the rest of the
model; then the part next to it onto the next tab on the model.
This should leave you with a triangular flap to close the model. Make sure
that the tabs it has to glue onto are lying at the right angles; apply the
glue and carefully stick it down.
9. Congratulations, you have made a compound of 2 tetrahedra.
It is also called the first stellation of the octahedron because you can
make it by sticking the small tetrahedra on to each face of an octahedron.
There are other ways to make this solid, click here
to see more nets, one coloured so that the small tetrahedra are different colours.
Repeat these instructions to make as
many decorations as you want. When you get bored with this shape you might
like to download a
2002 dodecahedral calendar (size 18K),
[PDF (12K)] and make that.
Click here to download a demo version of the
!PolyNet program used to make these files (size 140K).
Click here to see more models to make
Page last updated 10 Oct 2001
Click here to return to 'Fortran friends' top page


 5. Glue one side of one of the red parts to itself to make a tetrahedron
with open base to look like this. Glue 2 more of the red parts into
tetrahedra. Then glue all 4 of the white parts (with snowflakes) into similar
tetrahedra, making sure that the hanging loop comes through the point of one
of them.

